
Airport Dramatic Play: Making the Airplane!

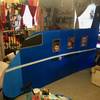
Our Vacation Bible School theme this year was The Incredible Race. I was the leader of the 3-4 year olds, so I decided to turn our room into one giant airport. The first thing I did was make a giant airplane prop for them to play in and especially to take photos in. It took me about a whole day to make, but it was totally, absolutely worth it! It was about 11 feet long and about 5 feet high.

Here's what I used to make it:
A TON of cardboard: We had two giant boxes that worked very well. You could also duct tape several smaller boxes together.
(optional) Large self-healing cutting mat
Duct Tape (I used Chrome for the decorating and a roll of black I had on hand for assembling)
Insulation Panels (This helped it stand up!)
Paper, Scissors, etc. for decorations.

Okay, so the first thing I did was lay out all the cardboard in the room. I lined it all up lengthwise and then taped the seams together (both sides) as well as taped the creases to reinforce them. It was LONG!

I cut the front of the plane into a general plane shape. I found a picture online of a jet plane and used that to base my curves off of. I cut them with the boxcutter. This is where you'll need the self-healing cutting mat. If you cut a straight line, you may be able to use a rotary cutter, and if you do use a rotary cutter, make sure you DO use that mat.

I didn't want to spray paint the plane because I don't like how uneven the paint can look, so I sprayed the cardboard with the spray adhesive, one section at a time. Follow the directions for use, and then place your posterboard on the cardboard.

I walked around on the edges of the posterboard and in the middle to help the posterboard stick to the cardboard.

Finally, the whole plane was covered!

I wanted a different color for the nose of the plane, so I traced the curve of the plane and cut out the posterboard to fit it.

Attach to the plane using the same method as above. Let it dry for longer than it says it needs to.


Your basic airplane outline shape is done, so now it's time to decorate! I took the chrome tape and made a stripe down the entire plane.

Then I put the letters on the plane under the stripe, as well as some symbols I wanted to have on it. I also added some black posterboard for the airplane windshield.
Here is where I didn't get photos done because it was all hands on deck for this part. You need to attach the plane to the insulation panels. You can either tape it or use the spray adhesive... however you do it. We used the spray adhesive and then cut off the extra insulation. One thing I made sure to do was to make sure that the seams of the insulation panels did NOT line up with the seams/creases on the cardboard.

Next, I cut out three windows for the kids to stick their faces in. I took an 8x10 frame to use as my basic template. You can make the windows bigger or smaller from there. Since the airplane was so long, I chose to have 3 windows, but you can put as many or as few as you need to depending on the length of the plane.

The cockpit window was too close to the top of the plane to make into a window. This is my only regret.

After all the windows were cut out, I lined them with the chrome duct tape to make them really POP against the blue airplane. It also helped hold the windows to the insulation.

I added a tail to the end of the plane. I used the same photo of the jet to shape it, and then I attached it with a bunch of tape. I didn't add insulation to this part, but instead, I taped a yard stick to it. Up to you how you want to make it stand up.

Of course we had to take photos at home! The boys had a ton of fun playing with it before we brought it over to VBS.

I made a last minute decision to outline the cockpit window with some more chrome tape. I do think it made it stand out a little more.

It was a pain to store until we could bring it to church, but it was fun while it lasted.

I also made a wing out of the leftover posterboard. This didn't serve any functional purpose, but it did look really cool.

During VBS, I put it up against the wall so that the kids could sit by it. When it was playtime and they were going to be running through it, I had a leader help hold it up from both ends just for extra support. 3 & 4 year olds are ROWDY!

I decorated the whole wall behind it with blue plastic sheeting to look like the sky and cut out some clouds out of white posterboard. Finally, I put up a TON of Christmas lights just for fun.

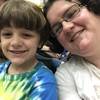
Isn't Cocoa Puff cute? Love this. His hair was BONKERS that week. I cut out this picture of each of the kids in my VBS group and I pasted it into the pretend passports I made for them and gave to them at the end of the week. (free printable is coming soon!)
The airplane was a HUGE hit in our classroom and nearly every other group wanted to come and use it and take photos with it. It really helped set the scene in our room, and it gave the kids a chance to get their wiggles out during VBS.
More posts coming: how I made suitcases, an X-ray baggage scanner, and how I decorated the rest of the airport room.
When was the last time you were on a plane?


Comments
No, seriously, this is an awesome step-by-step tutorial, Rachelle. I LOVE how you pulled this together, and it was clearly the hit of VBS - great work, Mama!
Totally pinning this.
Visit the website: "https://www.ridetransferdirect.com/sv/taxi/transfers/malaga-flygplats/marbella/".