
Building a LEGO table out of an old piano bench

I've got two LEGO obsessed kiddos. Cocoa Puff still prefers to play with Duplo blocks, but he's starting to get the feel of the smaller LEGOS, especially since LEGO released the LEGO juniors kits which are made for kids transitioning from Duplo to LEGO. Since our house is overrun by LEGOs, I made this LEGO table for Froot Loop out of an old piano bench!

Actually, it wasn't too hard, and it was a LOT less expensive than buying a premade LEGO table. It just took some time and a little bit of thinking. It also took the items below, as well as our old piano bench.

Extra LEGOS (I used mostly 4x2)
Lots and LOTS of hot glue
Now, our piano bench was old and broken, but it came with our secondhand (or more likely, our third or fourth-hand) piano. When Froot Loop started piano lessons, we invested in a really nice piano bench that was easily adjustable so that both he and I can practice. Anyway, the top part of the bench came off since the brackets were broken, which actually made the process a little easier.

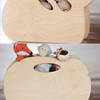
So I started by figuring out where I wanted all of the base plate pieces to go. I decided to put the tan "beach" plate underneath the blue "water" base plate, and then the other colors as shown. There was a little bit of overhang from the piano bench, but I wouldn't go any more than about an inch or inch and a half over the edge if you need to.
[[image: 5932]]
Pick which piece you want to start with. I chose the center on one of the sides.

Use hot glue and go all around the edge as well as a few lines in the center. The larger your base plate, the more glue you will need. Don't be afraid to use "too much", but you also don't want the glue to leak out around the edge.

Attach to the bench and hold down for 30 seconds or so.

Pick your next piece and do the same thing.

Make sure you line up the dots as well as you can.

You have about a second of wiggle room, so if it's not exactly lined up, you have a second to do so.


Take two or three of your extra 4x2 LEGO pieces and attach them to the two plates to help them stick together.

Continue with your next piece.


For every new base plate you put down, make sure to attach LEGOS to both plates to help keep it attached the right way.

I did the center baseplate next. This was the only "tricky" part as you have to really make sure this piece is lined up correctly.

Don't forget to put your LEGO pieces on the edges to anchor them together.

Move on to the next base plate.

Put your LEGOS on BOTH edges that meet up with another plate.

Keep going with your next plate, making sure to stay lined up.


And of course, don't forget to put your LEGO pieces on to stick the plates together.

Don't be afraid to use more LEGOS. The more LEGOS you have between the adjacent plates, the tighter the hold will be while it dries.
Repeat these steps for every other base plate you're attaching.
For a video that helps explain the process, please watch THIS YOUTUBE VIDEO.

We had an extra shelf from a set of bookshelves we combined together, so I decided to make another platform for Froot Loop to use as a vertical surface. I made this one the same way, and since I had a little extra space on the edge, I used a strip of LEGO tape to completely cover the shelf.

While everything else was drying, I filled the inside of the piano bench with LEGOS!

Once everything was dry, I tested out the bench. I was really rough on it, and only found two corners that needed a little extra hot glue.

I put the lid back on the bottom part of the bench and then placed it against the wall. I put the extra shelf on the windowsill behind it. Since there's lots of space under the LEGO bench, we bought a few of these LEGO storage bricks in various colors to hold the LEGOS.

When Froot Loop got home from school, he was SO EXCITED about his new "LEGO area." He immediately went to work building several creations.

Overall, I am incredibly happy with how it turned out and I just LOVE that he has his own space to build with LEGOS and the ability to leave unfinished projects out to complete later.
Where does your family play with LEGOS?


Comments
Thanks for sharing!